

Master the Workhorse: A No-BS Guide to Your Circular Saw
Let's get one thing straight: the circular saw is the workhorse of the jobsite. It's the one tool that does more heavy lifting than just about anything else in your kit. But let's also be honest—it can be an intimidating beast if you're new to it. That screaming blade and raw power demand respect.
The good news? It's not complicated. Once you know the basics, you'll be cutting straight, true, and safe every single time. This guide is your no-BS ticket to getting confident with your saw, whether you're a weekend warrior or a new guy on the crew.
Know Your Weapon: The Anatomy of a Circ Saw
Before you make sawdust, let's do a quick walk-around. Knowing the parts makes the whole job easier.
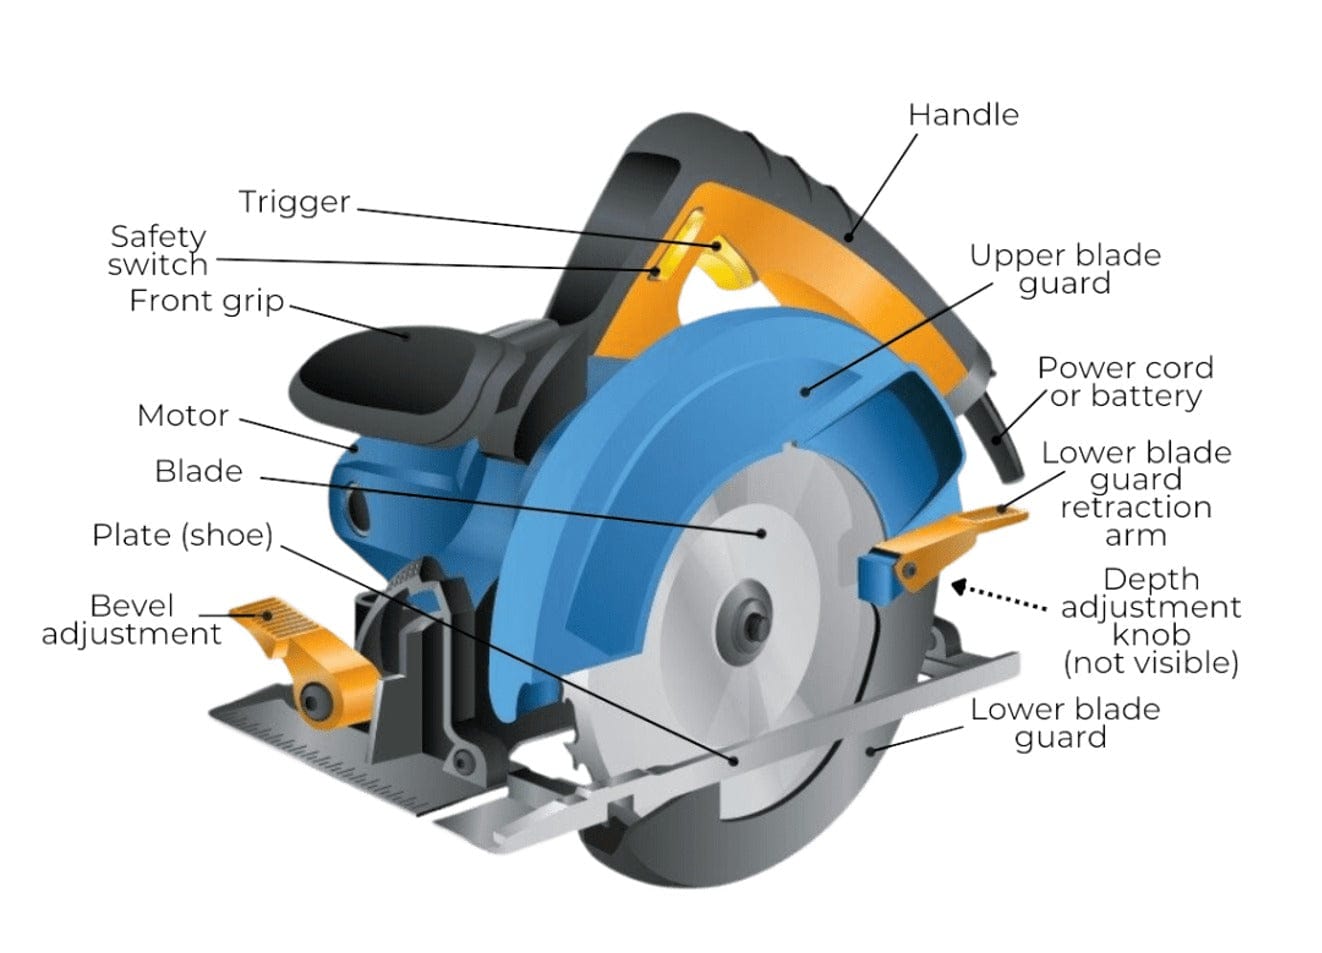
- Handle & Trigger: Pretty simple. You hold this and squeeze to make it go. Release to stop.
- Trigger Lock Switch: The little safety button you have to press before the trigger will engage. It's there to prevent accidental starts.
- Front Grip: Your other hand goes here. This is for guiding the saw, not for forcing it.
- Blade Guard: The metal cover that snaps back over the blade when you're done. It's there for a reason. Don't pin it back (we see you).
- The "Shoe" (or Base): This is the flat metal plate that rests on the wood. Keeping this flat and firm on your workpiece is the secret to a straight cut.
- Bevel & Depth Knobs: These are your adjustment levers. The depth knob lets you set how deep the blade cuts. The bevel knob lets you tilt the shoe for cutting angles (miters).
- Power Source: This is either the cord you're trying not to cut or a battery. Frankly, the new cordless saws are where it's at. A platform like Bosch's CORE18V gives you all the power of a corded saw without the hassle.
The Business End: Choosing the Right Blade
Your saw is only as good as the blade you put in it. The "TPI" (Teeth Per Inch) is what you need to know:
- High TPI (e.g., 60-80T): More teeth = a smoother, cleaner cut. This is what you want for finish work, plywood, or trim where you don't want ugly splinters.
- Low TPI (e.g., 24T): Fewer, bigger teeth = a faster, rougher cut. This is your workhorse blade for framing, demo, and ripping 2x4s.
You can also get specialty blades for cutting metal, tile, or fiber cement. Don't use your wood blade for that stuff.
Need a fresh blade? We've got blades for every job, from framing to fine finish.
How to Make a Cut (Without a Plywood Catastrophe)
Alright, let's make some sawdust. Here’s the play-by-play for a basic, straight cut.
- Measure & Mark: Measure twice, cut once. Use a pencil and a Speed Square to draw a clear, straight line.
- Clamp Your Work: Don't be a hero. Secure your wood to a sawhorse or workbench so it can't move. Crucial Tip: Let the "cut-off" piece hang free. Don't clamp both sides of the cut line, or the blade will bind and kick back.
- Set Your Blade Depth: This is key. Loosen the depth knob and adjust the shoe so the blade sticks out just 1/4-inch below the bottom of your wood. Too deep is dangerous and causes more tear-out.
- Line It Up: Rest the front of the saw's shoe on the wood, with the blade next to your line, not on it. (Always cut on the "waste" side of the line).
- Get to Full Speed: Press the safety lock, squeeze the trigger, and let the blade get to full speed *before* it touches the wood.
- Push, Don't Force: Ease the saw forward, keeping the shoe flat and firm against the wood. Let the saw do the work. If you have to force it, your blade is dull or you're pushing too hard.
- Follow Through: Guide the saw all the way through the cut. Release the trigger and wait for the blade to stop completely before you lift the saw.
Crosscuts vs. Rip Cuts (And How to Keep 'Em Straight)
You'll hear two main terms thrown around:
- Crosscut: A cut against (across) the wood grain. This is what you do when you're cutting a 2x4 to length.
- Rip Cut: A cut with the wood grain. This is when you're cutting a 4x8 sheet of plywood down to a 3x8 sheet.
For short crosscuts, your best friend is a Speed Square. Hold its raised edge against your board and slide your saw's shoe right along the square's straight edge. It's a perfect 90-degree cut every time.
For long rip cuts, you need a guide. You can buy a dedicated circular saw guide, or just clamp a long, straight 1x4 or level to your workpiece and run the saw's shoe along that.
Safety Is Not a Joke: How to Keep Your Fingers
This tool is fast and powerful, which means it can be dangerous. Respect it.
- GEAR UP: Safety glasses are not optional. Ever. Ear protection is a smart move, too.
-
KICKBACK: This is the #1 danger. It happens when the blade binds and the saw jumps back at you. It's violent and fast. Prevent it by:
- Using a sharp, correct blade.
- Not clamping both sides of your cut.
- Keeping the shoe flat and not twisting the saw.
- HANDS OFF: Keep your hands clear of the blade path. Always.
- CORDS & BATTERIES: Unplug the saw (or pop the battery out) *any time* you change the blade or make adjustments.
- Same goes for your cord. Always know where it is so you don't cut it.
The Bottom Line
The circular saw is an absolute must-have. Once you're comfortable with it, you'll be able to tackle framing, decking, shelving, and a thousand other projects with speed and precision. Get a good one, treat it with respect, and it'll pay for itself a hundred times over.
Ready to add a new workhorse to your stable? Shop our full selection of Circular Saws and find the perfect fit for your next job.